Creating a New Domain Controller
.png)
I will recommend using a Microsfot Tool from SysInternals that will help us RDP into many computers at ease
Remote Desktop Manager is a great freeware we can make use of.
Set up our Virtual Network
On Azure create VNET(Virtual Network) lets call it [vnet-azdc01],
Create a Resource Group.
Create VM(Virtual Machine) using an Windows Server 2022 Image [AZDC01]  this will be our DC + DNS Server.
Create another VM to be our Work Station (WS01)
Attach your Domain to Azure
An essential part of this step is to link your FQDN name to Azure,
this will proof to Azure that you have full ownership of the domain.
[AZURE] ▶ Active Directory ▶ Custom Domain Names ▶ Add Custom Domains
Copy the DNS record provided by Azure and save on your Domain Name Registrar(godaddy, cloudflare, 123reg..)
Adding DC Roles
At this point you should have your DC Server running, and your domain registered on Azure, so lets configure it.
RDP▶ AZDC01
[AZURE] ▶ Server Manager ▶ Dashboard ▶ Add Roles andFeatures ▶Next
Check  Active Directory Service  and  DNS  ▶ Next … ▶ Finish
From Notifications in Server Manager Window (Top Right) Click on Promote this server to a Domain Controller
Add a New Forrest▶ Root domain name : [custom Domain name] ▶ Provide DSRM Password ▶ Finish
Restart the machine.
DNS Setup
We now need to change our DNS Server on our VNET to use the DNS we have just created inside our DC.
Next step is to update the DNS server our VNET on Azure is using, so make a note of the Private IP address of the DC.
Confirm we are using a static IP address for our DC
[AZURE] ▶ Virtual Networks▶ [vnet-AZDC01] ▶DNS Sever ▶ Custom DNS ▶ Private IP AZDC01
Connecting WorkStation to Domain
Now are ready to connect our WS01 to our domain, as long as the WS01 can reach our DC01 we will not have any problems.
RDP ▶ WS01 (local user)
Windows + run  then type : “sysdm.cpl”
Or Go go Control Panel and  Search for “Allow remote access to your computer”
System Properties ▶ Computer Name ▶ “.. rename computer or change domain..” ▶ Change
Domain▶ Login with “YourDomain.com\userName  :  password”
You should get a message saying you successfully joined the domain and asking to reboot
Restart the machine
Creating Users and Groups on DC
It's time to create our Global Administrator account, so far we have been using the local account we have set up using our Azure Tenant. On this step, we are also going to set up our WoskStation account.
[AZURE] ▶ Azure Active Directory ▶ Create a User ▶ Give Global Admin Role
Verify you can login with the account.
RDP ▶ DC01
Windows Administrative Tools ▶ Active Directory Users and Computers
Create two users,  user01@ and one Admin@
The Admin@ its going to be our Global Admin for our domain
Create a new Group, Add user to group[Home Users]
After completing the previous step the users you have created on DC should be able to connect to our DC,
(as long as the WS01 is on the same subnet of the DC01), we will focus on VPN another time.
Later we will also look into how to install and configure Azure AD Connect V2
To fully sync our On-Prem users to our AzureAD, or should I call it
Microsfot Entra ID
which help synchronisation of our Users, Groups and if we like password hashes, using writeback function.
Enabling RDP Users to WS01
Because we are using RDP to connect to our WS from the Azure cloud☁️, we need to complete one more step.
RDP ▶ WS01(local user)
Windows + run  then type : “sysdm.cpl”
Or Go go Control Panel and  Search for “Allow remote access to your computer”
Remote ▶ Add ▶ Users/Groups ▶ Select [Home Users] we have created.
Login with “YourDomain.com\userName  :  password”
After this steps we will now be connected to your domain and be able to login using our organisation credential.
Enabling RDP to our DC01
Our Domain Server is more strict and we need to configure a few more things to allow an user to RDP into it.
Add our Admin account to the Built in Groupd Remote Desktop Users

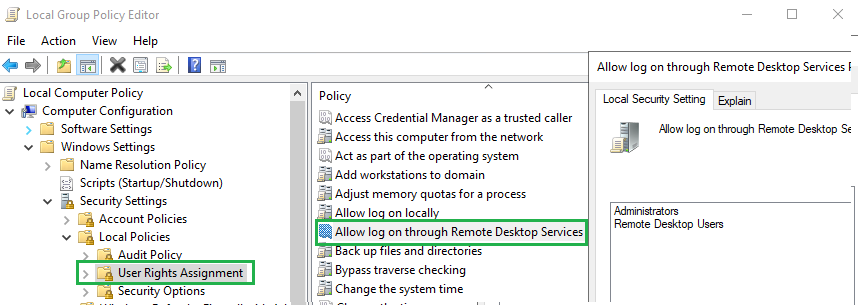
We will also need to allow log on throught Remote Desktop, from our local Policies

DC01 ▶ Edit Group Policy ▶ Windows Settings ▶ Security Settings ▶ Local Policies ▶ Users Rights Assignments ▶ Allow log on through RDP
Add Group : Administrators, Remote Desktop Users
On the same window you have open, on Deny log on throught RDP, make sure your group is not present there.
After run the below as Admin on powershell
gpupdate /force
You should now be able to now login into your DC using your newly created Global Admin account.
Deallocate your VMs when done!

A very important step which should not be taken for granted is to decommission your VMs when not in use.
Not just turn them off, you want to deallocate your VMs so they stop consuming cloud resources and your bill remains low.
You will still pay for the HDD/SSD space its using but this is generally low. FOr more information here is an article
Conclussion
On this blog we managed to create a new hybrid DC controller using Azure.
Connect to our DC from a Azure Cloud VM
Enable RDP to our users
The next steps from here is to enable Azure DC Sync from our On-Prem Server to AzureAD.
Follow the next steps here Azure AD Sync Install and Config.
.png)