-min.png)

👽 Alien Vault Open Source SIEM
AlienVault OSSIM, or Open Source Security Information and Event Management,
offers several benefits for organizations seeking robust security management solutions.
It consolidates security event data from various sources, such as network devices, servers,
and applications, into a centralized platform.
Deployment Decision

The first step is deciding how the architecture of our deployment will look like, this will vary on what you are trying to achieve and also how many devices you are planning to monitor.
Next is downloading the .ISO images from the Alien Vault website After installing both Server & Sensor we can test if the server can communicate with the sensor by selecting on the server the option “jailbreak” then ping the sensor for response.
Both the Sensor/Server will run on an independ OS, so its recommend to run them from a VM.
Types of Monitoring on Alien Vault
- Log Analysis Monitor
- Log Analysis
- Intrusion Detection System
- Vulnerability Assessment Monitor
- File Integrity Monitor
- Application Performance Monitor
- Compliance Monitor
Configure Server
Fist thing is changing the host name, go to System Preference and change the host name
Configuring Monitor Plugin
Next Configure Sensor > Configure Monitor Plugins
In OSSIM, selecting the right monitor plugin is essential for efficient monitoring of security events. Access the web interface, go to "Monitors," and choose the appropriate plugin for the desired monitoring functionality (e.g., network traffic, log analysis). Configure the plugin settings, including data collection parameters and alert thresholds, to optimize monitoring capabilities and enhance threat detection.
Set up the syslog, after we have everything set up now we want to push all the logs to our server.
Select nmap-monitor

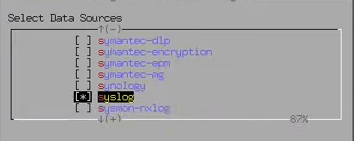
Configure Data source plugins
Configuring data source plugins in OSSIM is crucial for effective security monitoring.
Access the web interface, navigate to "Data Sources,"
and select the appropriate plugin for your data source (e.g., firewalls, IDS/IPS).
Configure connection details, authentication, and data collection parameters.
This ensures comprehensive threat detection and response capabilities.
Select syslog
 Apply all changes and reboot.
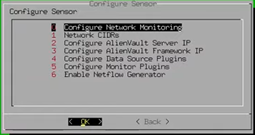
Configure Sensor
We are going to configure the sensor to have the exact same data source settings we had on our server.
In addition we will configure the AlienVault Server IP and Framework IP
In AlienVault, the framework IP refers to the IP address associated with the management and
coordination of the entire OSSIM system. The server IP, on the other hand, refers to the IP
address of a specific component, such as a sensor or a log server, within the OSSIM infrastructure.
On our case we are setting up both IPs to be the same.
Configure Network Monitoring
This is the interface that is set up to be on (promiscuous mode) or listening mode,
which will allow you to capture all traffic going across the network.
The host should then have two network adapters, eht0 to perform normal functionality
over the internet, and eth1 on promiscuous mode to capture traffic.
Apply changes when done.
Configuring Web Server(Client)
These are the items that will be monitored, and the only configuration is that they are under the same subnet that we are running the Sensors/Server and can communicate with each other.
Make sure the IP of the server is under is withing the subnet mask of your Alien Vault
To change the IP of an ubuntu machine, one way is going /etc/netplan and modify the
netcfg.yaml file on the folder. Below is a example of what we can use

Using OSSIM
With all the servers running we can now access the Alien Vault from our internet network using
the IP address we have set up, in this case it was 192.168.100.150.
The first time we login we will be presented with the wizard, and then with a page to
install the HIDS(Host Intrusion Detection System) to the servers.

the username + password is the login details of the deployment server you are targeting the HIDS.
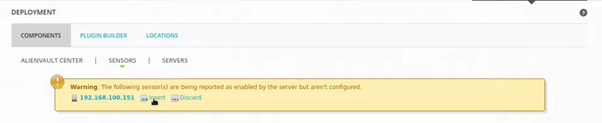
Finishing Configuring Sensor
A few more steps to finish up the connection with our sensors.
From the Server WebClient, go to Sensors> Insert to finish configuring the sensor
Checking Configuration on Sensor
After updating the sensor the status should now be showing as up, we now need to go
inside the sensor settings on the right and select Sensor "Configuration"
 Check the Detection tab and they should all be good to go.

Applying Directives
These are set of rules and what we will use to configure our detection across the network
HOME_NET is any traffic that is coming from my private network.
Go to Configuration>Threat Inteliggence> Directives
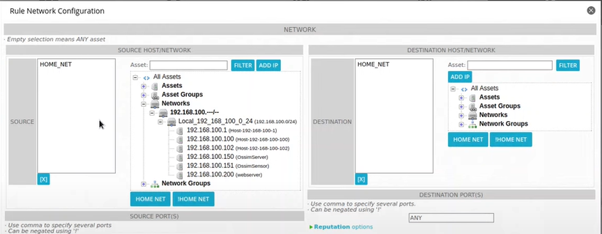 Once you have made the changes, click on Reload Directives.
Configuring NIDS
We are going to configure the sensors to detect NIDS.
When we installed AlienVault Sensor, we have also installed suricata.
Suricata is a powerful open-source intrusion detection and prevention system (IDPS)
that analyzes network traffic to detect and respond to security threats.
It provides real-time alerts, traffic inspection, and rule-based analysis to
protect networks from various attacks.
AlienVault OSSIM, on the other hand,is an open-source security information and event management (SIEM) platform
Configure Suricata(NIDS)
Log back into the Sensor unsing the terminal and go to /etc/suricata
We are going to modify the suricata.yamlopen the file using nano and search
for EXTERNAL_NET
We wanto to updade that line to now be
EXTERNAL_NET any
The line "EXTERNAL_NET any" signifies the definition of the external network for intrusion detection purposes. It indicates that Suricata should monitor all incoming traffic from any external network or source. This rule allows Suricata to analyze and detect potential threats originating from outside the network perimeter.
Conclusion
With our preparations complete, we are now prepared to begin ingesting data.
As a result, our log server will start receiving detections generated by the directives
we have established.
These detections will provide valuable insights into potential security
incidents and aid in our ongoing monitoring and response efforts. By populating our log
server with these detections, we enhance our ability to proactively address threats and maintain a secure environment.