-min.png)
Quick tips on how to use Git and Github
This is a short article with a high level overview on some of the main commands used to main source control, using GIT and GitHub
We are going to have a look on
- How to keep track of our source files
- Make sure only the correct files are being tracked
- Staging Files, commiting an pushing it to the cloud
- Work on Branches and merging back together
- Go back in time restore our files
Git vs GitHub
Git is the command line that is used that will help us keep control of the source code of our application. As we use GIT the history of commits are saved on our local machine, so its possible to use GIT without using github.
GitHub is an online repository which has git running on the background. It's very common to use Git and GitHub together, GiT will keep you in charge of the versions of your code, while GitHub will be the remote repository where you can save different branches,versions and features.
The command we will look on this article work on both Windows and Linux.
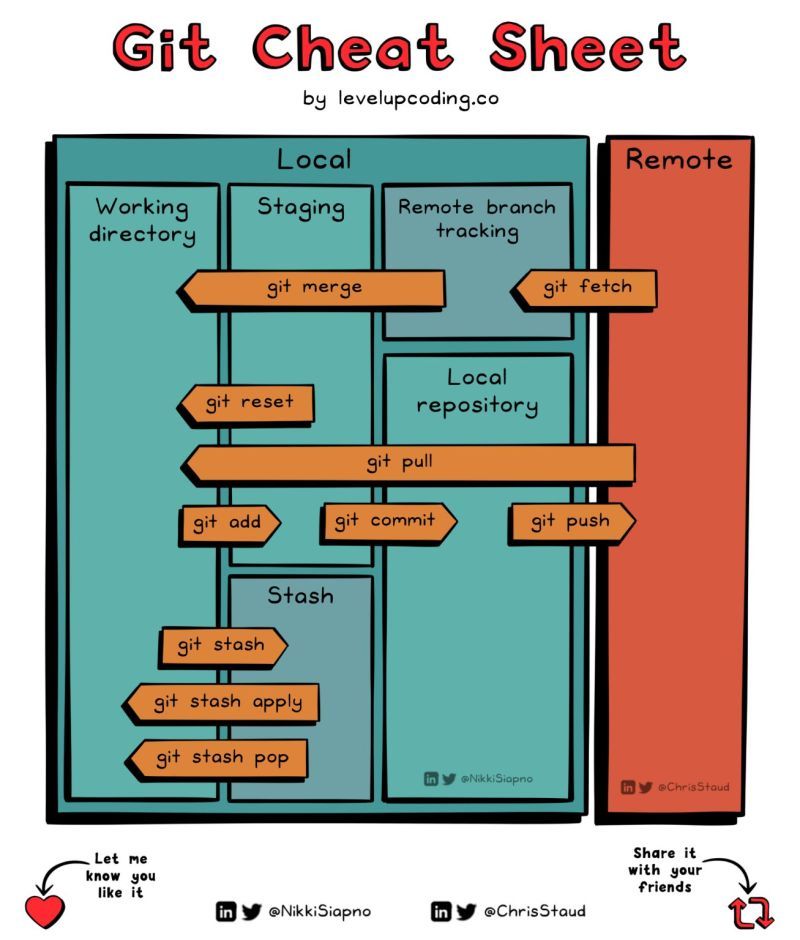
💎 Git CheatCheat 💎
Initializing Your Project
There are a few ways to initialize your project, we are going to look first on the following scenario: You have a local repository you are working on and you want to keep track of changes on it.
Initialize Commands
git init
WIll initialize the code and create a .git folder with the the config, description, HEAD files.
Add your .ignore file
This file will basically tell what files/folders are not to be tracked.
There are many templates we can find online, of .gitignore depending on which project you are working on.
Here is an example of Python .gitignore
Add Files to be tracked
To add files to be tracked you can use the name of the file like
git add file_name Or you use
the short command below to track all
git add .
The "." means everything! Only use this command if you have a .gitignore in place, or you will track everything on your folder.
First Commit
Its time for your first commit! This is where you are placing your files into staging and they will be ready to be pushed to your online repository if you wish.
When you commit your files you save in memory the exact files that were on that moment in time, and how the code was on that moment. You can jump between commits without needing to use GitHub, everything is saved local.
git commit -m "first commit"
Push to GitHub (optional)
Create Alias
Normally at this stage is where you would push your repository to github. You first would need to create a new repository on github.com and copy the HTTPS url address, in case you have already configured your SSH connection with github you can use the ssh url instead.
Also, instead of having to type your url everytime you want to push your code, we are going to create an alias for the url which will allow us to push our code without having to type the whole url again, YAY! 😆
Run the code below to create a variabkle named origin on your environment.
You are pretty much creating a value pair between "oring" : "YOUR_URL"
git remote origin https_url
If you are presented with a warning to login you will need to run the following:
gh auth login
Name Already exist
A common issue can be a warning saying.
remote origin already exists
To fix this issue run the below to chec if name already exist.
git remote
Then use the below to remove the name from the repository, before trying to adding it again.
git remote remove origin
Push the code to GitHub!
Now that you made this far you can push your code to github and have it saved on the cloud 🌨
git push -u origin main
Make sure to select private repository if you are working under NDC.
Managing Github
Now that you have your repository hooked with github you got all the pieces you need to start developing, and managing your code with the appropriate version control.
Add Files to be Trackeds
We had a look at this earlier, and as the name suggest you need to track files before they are added to your code repository commit history You can run git add file_name or git add --all, or if you want to be like the cool cats😾 type the below.
git add .
Commiting Files & Push
A commit is like a moment in time which is saved, and you can go back and forth to it, its the main part of git really
git commit -m "type a description about your commit here"
The below is used after you have commited your files and you are ready to push the changes to your github repository
git push origin main
Because you have already created an alias named origin, you can simply run the command with origin instead of having to type the whole https/ssh url again.
Staging
Check Staging Status
This command will give you an indication of what files you are tracking and what will be pushed into the repository
git status
Check Difference & Status
The below will give you a overview of what has changed since your last commit.
git diff
This code will show you what files are on the stage and will be commited the next time you run git commit
git status
Branching & Merging
You always want to work on branches and merge your code to the main once you have completed a test cycle.
Often Branching and Merging goes hand in hand with git, as one is the opposite of the other. Below is a summary of the commands
A Branch history will be kept separte from the original main branch so you can work without interfering the main code.
List all current Branches
The below will give you a list of all the current branches available
git branch
Create New Branch
When you want to work on a new feature or mayb test a possible module for the application,you should create a new branch.
git branch branch_name
Switching Branches
After you have created the branch you want to move into it, to start workig on your new feature.
git checkout branch_name
Deleting a Branch
git branch -d branch_name
Merging Back to Main
You have been worknig on a branch and now you are ready to merge your code back to the main, we now need to run the merge command.
We need to switch back to the main branch first, then we want to run a command which will merge the feature branch into the main branch.
Switch to Main
git checkout main
Now inside the Main branch, we run the below command to merge the feature branch into the main.
Merge Together
git merge branch_name
Log and Checkout
Again, this two functionalities goes hand in hand on GIT, and its important to know how to use both of them.
The git log command will show you all the commits you have done on this repository.
The command will show you hash value of the commit like for example 44abedff This hash value we will use on our next command to move in an out of different commits.
Log
git log --oneline
The checkout command is used when you want to move into another commit, or point in history. All the files and code will revert back to how it was during that point in time.
Checkout
git checkout hash_value
When you use the git checkoutyour branch name will be placed on something called HEADER before you start commitchanges to your code you will need to move back to the branch.
Restore & Reset
This command is useful when you are working on a code feature and accidetally have found out the feature is giving you glitches since you have last fetch your code from the repository. This feature will revert the file back from your last commit.
git restore file_name
The below command will remove the file from the stage
Restore
git restore --staged file_name
When running git status files in green are stages, while files in red are not staged.
To remove all changes made since your last commit run
Discard changes
git reset --hard
Revert & Reset
This are very important features and some which should be used very careful. The reset command will undo a commit by removing the features it has added. On the git log it will appear as a new Revert-changes:name of commit reverted
Revert
git revert hash_value
Git reset commit is dangerous, and there is potential of permanent loss if not used careful.
Reset will remove all commits from your history and throw you back in time like those commits never existed. This is useful when you want to clea up your commit history, or combine different commits together. To use the following command
Reset
git reset hash_value
We are using the hash value we obtain when running the git log --oneline
Summary
So to review we had a look at the following:
- How to keep track of our source files
- Make sure only the correct files are being tracked
- Staging Files, commiting an pushing it to the cloud
- Work on Branches and merging back together
- Go back in time restore our files
Hpefully by the end of this guide you have gained some experience in using GIT and how to keep yuor source files securely in check.